Web Conferencing Apps
The purpose of a web conferencing application is to enable a virtual meeting: to enable you to see and hear all of the people who are getting together without being physically present in the same place. As it may not be safe to be together in the same room, even with personal protective equipment, a web conference application is a viable option for meeting from a distance. It requires a reliable internet connection and a device which enables you to hear audio and see video.
-
Apps being used:
Just as you can get into pretty much any rental car and drive with just a few minor adjustments (e.g. seat position, the tilt of the wheel, the angle of the mirrors), you can get the required video and audio to participate in a remote proceeding using any of a variety of web conferencing apps. Whatever the firm or agency or court wants you to use really shouldn’t make a big difference in terms of what you need to know to use it. Just a few minor adjustments and you can be up, running, and ready to go.
Sample Web Conferencing Apps Zoom WebEx GoToMeeting Microsoft Teams Group Facetime (Apple only) Google Hangout Jabber Amazon Chime UberConference BlueJeans TeamViewer Skype -
Common features:
Quality shared audio and video
Screen sharing
Multi-device support
Easy-to-use interface
Chat
Meeting recording
Business grade product: security options
-
Security Tips (for meeting organizer)
Business plan, not consumer plan (for more administrative/security tools)
Latest software version
ID assigned for each meeting (vs. reusable personal ID)
Password protection
Links sent privately
Use a waiting room and assign a person to monitor, approve entrance and/or re-entry
Limit screen sharing
Meeting locks
-
Tips for Best Experience
Call-in vs. computer audio
Request that currently non-speaking participants mute their audio
-
Turn off your video if/when you do not need to be seen
Zoom, Teams – Virtual Background
Other apps: Position yourself in front of a plain background, or use 3rd party app such as ManyCam
Remember, when your video is on, you can be seen.
Close the door during proceedings
Exclude pets, children and/or spouses as needed.
Equipment and Setup for File Translation (No Realtime)
NOTE: Reporters report different quality results with different equipment, connection speeds, etc. There is no consensus on a particular brand, model, type etc. for the best possible results with audio and video that applies to all reporters.
-
Device for web conference
Video – The web conference app can be opened on a computer, tablet, or smart phone. If you have a webcam on the device, your image can be transmitted to the others. You will control whether or not your video is on or off.
Audio – The web conference sound can be played from the same device as the video or separately on a phone, using a provided call-in number.
-
Writer
If you are not planning to use AudioSync, then there is nothing else to set up.
-
AudioSync Setup
If recording for AudioSync on the writer using the web conference audio:
TIP: Most reporters with experience of remote reporting have concluded that calling in via telephone and playing through a speaker results in superior quality vs. audio provided by a web conferencing app. If there are any difficulties with the app’s audio performance, the app will likely advise you to limit your required bandwidth by eliminating the video portion of the conference call or by using telephone audio instead; so beginning your conference by using separate devices for audio and video is usually the most prudent method.
-
The laptop you use to run the web conferencing app should have a microphone port and a speaker/headphone port. If it does not, you can plug in an external sound card with both of these ports, such as the Andrea PureAudio sound card.
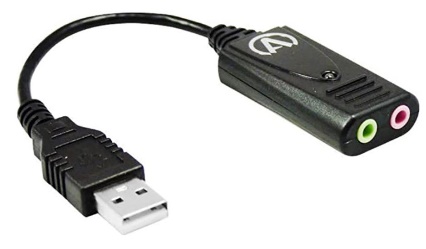
Connect a microphone to the microphone port, for use if/when you need to speak to others in the web conference.
-
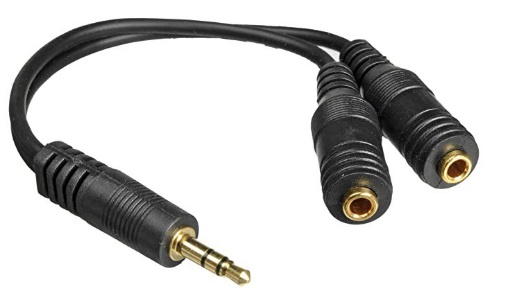
Plug a splitter device into the speaker/headphone port.
-
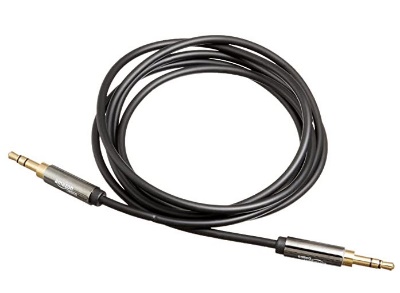
In one of the two speaker/headphone ports, connect a speaker or headphones. In the other port, connect a 3.5mm AUX male to male cable and connect it to the microphone port of the Luminex II, Luminex, or Diamante.
-
Click the link in the invitation, or open the web conferencing app, enter the appropriate ID number, and select to use the computer audio.
NOTE: On the device running the web conferencing app, you can mute the microphone, to prevent others in the conference from hearing you. When you need to communicate with those parties, you can unmute, and then mute again before you begin writing.
The microphone used by the web conferencing app is not the same as the microphone used by the writer. Muting the audio in the web conferencing app will not interfere with recording to AudioSync.
- If recording for AudioSync on the writer using a phone
Connect your microphone to your Luminex II, Luminex or Diamante the same as you would for an in-person proceeding.
-
If your cell phone’s built-in speaker is not sufficiently loud for you to hear it wherever you will be writing, connect it to an external speaker.
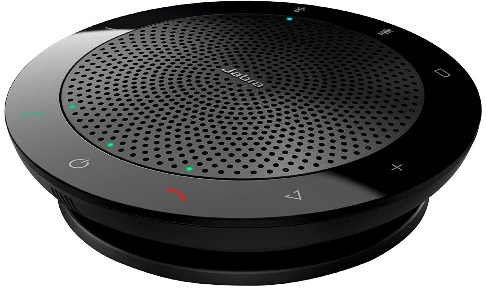
There are a wide variety of brands and models of speakers built for phones available in a wide range of prices. Any model that is advertised to work with your brand and model of phoneshould work for this purpose. You may want to consult colleagues as to the particular speakers they prefer to use for this type of work. The speaker will also have a built-in microphone that you can use to communicate with the other parties in the web conference.
The speaker will likely have a mute button so that you can prevent the other conference participants from hearing anything from your location when you are writing. (Your speaker will not be affected by the Mute button in the web conference app.)
-
In most cases, connecting the phone to the speaker via Bluetooth is a plug and play operation. Simply turn on the speaker, and then turn on your phone. The phone should search for the device and connect. If it does not, check the settings feature for your phone, find the Bluetooth option, and select the name of the speaker as the device to which you want to connect. (If you still fail to connect, consult the manual that came with the speaker.)
TIP: Most speakers will have batteries that require charging. If you want to keep the device charged while using it vs. relying on its battery power, you should plug the charging cable into an external power source. Although you may be able to power the speaker by plugging it into a computer, this is not advised, because the speaker may attempt to connect to your computer rather than to your phone. Rather than having to manually change the connections to ensure that the correct device is connected to your speaker, simply plug the speaker into a wall outlet or some other power supply.
Use your cell phone to call the number provided in the emailed invitation to the online meeting, or, if you’ve clicked a Join button in a web conferencing app and are given an option between Computer Audio and Phone call, click the Phone call tab or option, and enter one of the provided phone numbers. (You may be given several phone numbers with several different area codes in different time zones and proximities to your current location.)
-
Place the computer’s microphone near the speaker.If you are not using an external microphone, you may need to place the speaker nearer to the computer’s built-in microphone. Check your computer’s hardware manual to determine the location of that microphone.
TIP: As you are NOT using the web conferencing application’s audio, you can safely mute the audio microphone shown in the toolbar as that only affects sound from the web conferencing app. If the Mute command has a down arrow next to it, you may be able to access additional options such as an option to turn off the web application’s audio feature. Turning it off will not adversely affect your access to the sound, because you are taking the audio from a different source (the telephone). Having the audio muted or disabled when not required can improve the app's performance.
-
To access the web conference, click the link provided in the invitation, and follow the prompts for directions to connect.
Equipment and Setup for Realtime Translation (not including output to CaseViewNet)
-
If you are using one computer for both CATalyst realtime and the web conference app:
-
Set up a second screen.
When using one computer for more than one application, it is a good idea to have more than one screen so that you can see the full screen of both applications simultaneously.
NOTE: If you are working on a desktop computer with a very large monitor, the single screen may be wide enough to comfortably display both CATalyst and the web conference app at reduced window sizes and still work comfortably. If you are using a laptop, a second screen for the second app is advisable.
After you connect the second screen to the computer, turn on the screen and the computer. Windows will automatically see that you have more than one screen. However, unless you have previously set up a second screen, Windows will, by default, duplicate the content on both screens. To enable different applications to “maximize” to a particular screen, you may need to change the Windows Display Settings to Extend vs. Duplicate.
Right click the Desktop and select Display Settings.
-
Scroll down to Multiple Displays and select Extend Desktop to This Display.
NOTE: The wording of the prompt may vary; for example, Extend Desktop to 1 and 2.
When prompted, click Keep Changes.
Scroll back to the top and under Rearrange your displays, click Identify. A number will appear on each screen.
-
The numbers should correspond to the physical positions of the displays so that mouse movement is intuitive. For example if it shows on the Screen 1 on the left and Screen 2 on the right, then the screen on the left of the desk or table should be the showing the number 1.
If the screen numbers under Rearrange your displays is not the same as the physical position of the screens, drag the image of one of the screens to the other side so that they are the same in Settings as they are on your desk or table. Then click Apply.
Connect your writer to your computer.
-
Open Case CATalyst on one screen.
When you open the software, it will open on the screen designated as the main display. If you want to move CATalyst to the other screen, click the title bar and then drag CATalyst to the other screen. Then, click the Restore button (in between Minimize and Close in the upper right corner at the end of the title bar) to expand CATalyst to the maximum size on that screen.
-
Click Translate dialog box, name the file, and select all options as you would for any realtime translation.
TIP: Double check your realtime options tab and make sure you have selected the correct writer connection method, especially if that has changed from how you connect when conducting an in-person proceeding.
-
Set up for AudioSync:
TIP: Stenograph highly recommends that you test your ability to record prior to your remote proceeding, to determine that you have all of the equipment that you need and that it is working properly and as expected.
TIP: Most reporters with experience of remote reporting have concluded that calling in via telephone and playing through a speaker may result in superior quality compared with audio provided by the web conferencing app. If there are difficulties with the app’s audio performance, the app will likely advise you to improve sound by eliminating the video portion of the conference call and/or by using telephone audio instead; so beginning your conference by using separate devices for audio and video is usually the most prudent method.
If you are using the web conference audio:
Web conference audio can only be recorded if your sound card’s driver has Stereo Mix as an option. Right click the sound icon in the Taskbar tray and select Open Sound Settings.Click the down arrow next to Recording Devices(or Input Device).
If you do not have the Stereo Mix option listed, you can try the following:
NOTE: The following is for informational purposes only. Stenograph cannot assist with the installation of audio drivers. If you need assistance, contact your computer manufacturer.
Open Control Panel in Windows and click Sound.
Click the Recording tab.
-
Right click any of the listed devices and see if "Show Disabled Devices" is checked. If it is not checked, click to check it. Then see ifStereo Mix is available. If it is,
select it.If Show Disabled Devices is selected and Stereo Mix does not display, you can get a free download of Stereo Mix fromhttps://www.realtek.com/en/component/zoo/category/pc-audio-codecs-high-definition-audio-codecs-software
(Choose the 32 or 64 bit "Vista, Windows 7, Windows 8, Windows 8.1, Windows10 Driver Only"), and install it. FYI, it’s a large file and takes a little while to download, plus you’re going to have to reboot your computer twice afterward, so make sure nothing else is running when you start to install. - Once the new driver is installed, repeat steps 1 & 2 – this time, in the Recording tab you should see Stereo Mix.
- However, if updating the sound card’s driver does not add/install the Stereo Mixer option, then you need to use Call-In (phone) audio.
-
If you are using the call-in number:
Connect your microphone to your computer the same as you would for a live proceeding. (If you typically use the built-in microphone in your laptop, consider connecting and using an external microphone for better results.)
If your cell phone’s built-in speaker is not sufficiently loud for you to hear it wherever you will be writing, connect it to an external speaker.
-
Use your cell phone to call the number provided in the emailed invitation to the online meeting.
TIP: If you are unable to locate the phone number skip ahead to step 4 and open the web conference application. When you’re given an option between Computer Audio and Phonecall, click the Phonecall tab or option, and enter the phone number on your phone. The return here and complete the next step.
Place the computer’s microphone near the speaker. (If you are not using an external microphone, you may need to place the speaker nearer to the computer’s built-in microphone. Check your computer’s hardware manual to determine the location of that microphone.)
-
Open the web conference application on the other screen.
NOTE: If you need to move the web conference application to the other screen, click the title bar and then drag it to the other screen. Then, click the Restore button (in between Minimize and Close in the upper right corner at the end of the title bar) to expand the web conference application to the maximum size on that screen.
Click the link in the invitation that was emailed to you and open the web conference application.
-
-
If you are using two computers, one for CATalyst realtime and one for the web conference app, or if you are using one computer for CATalyst realtime and a tablet or a phone to run the web conference app:
Connect your writer to your computer.
-
Open CATalyst on one computer.
-
Open the Translate dialog box, name the file, and select all options as you would for any realtime translation.
TIP: Double check your realtime options tab and make sure you have selected the correct writer connection method, especially if that has changed from how you connect when conducting an in-person proceeding.
-
Set up for AudioSync:
TIP: Stenograph highly recommends that you test your ability to record prior to your remote proceeding, to determine that you have all of the equipment that you need and that it is working properly and as expected.
TIP: Most reporters with experience of remote reporting have concluded that calling in via telephone and playing through a speaker results in superior quality compared with audio provided by any web conferencing app. If there are difficulties with the app’s audio performance, the app will likely advise you to improve sound by eliminating the video portion of the conference call and/or by using telephone audio instead; so beginning your conference by using separate devices for audio and video is usually the most prudent method.
If you are using the web conference audio:
Audio can be recorded by placing the CATalyst computer’s microphone near the speaker of the device where the computer audio is playing. Please note that unless the computer, tablet, or phone where the web conference is being run has excellent sound, this option may not produce optimal results.
-
Audio can be recorded by creating a cabled connection between the audio output from the device where the web conference is being run, to the computer where you are translating and recording audio with CATalyst.
Setup for two laptops (any two computers): The laptop running the web conferencing app needs a microphone port and a speaker/headphone port. This may be built-in, or it may be added on via an external sound card, such as the Andrea PureAudio card.

You can connect a microphone to the microphone port, for use if/when you need to speak to others in the web conference.
You would plug a splitter device (see illustration) into the speaker/headphone port.

In one of the two speaker/headphone ports you would connect a speaker or headphones. In the other port, you would connect one end of a 3.5mm AUX cable...

...and connect the other end to the microphone port of the computer running CATalyst.
NOTE: The Case CATalyst computer would not require an external speaker or headphones unless you needed to play recorded audio to an external speaker or headphones during the web conference.)
Setup for one laptop and one tablet or phone: If the tablet or cell phone running the web conferencing app has a built-in headphone port, you could connect a splitter to that port. (If your tablet or phone does not have a built-in headphone port, you would require an adapter from the manufacturer to create a headphone port to which you can attach a splitter. This can be purchased from the manufacturer of your phone or from an authorized provider of accessories for your phone.) In one of the two speaker/ headphone ports you would connect a headset or standard set of earbuds with a microphone.
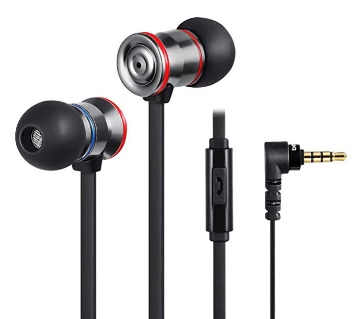
In the other port, you would connect a 3.5mm AUX cable (see illustration above) and then connect the other end of that cable to the microphone port of the computer running Case CATalyst. (The Case CATalyst computer would not require an external speaker or headphones unless you needed to play recorded audio to an external speaker or headphones during the web conference.)
NOTE: On the device running the web conferencing app, you can mute the microphone, to prevent others in the conference from hearing background noise from your location. When you need to communicate with those parties, you can unmute, and then mute again before you begin writing.
-
If you are using the call-in (phone) audio:
When writing realtime for remote realtime via a web conference app such as Zoom, you will likely want to be able to record the audio for AudioSync. Most reporters with experience of remote reporting have concluded that calling in via telephone and playing through a speaker results in superior quality vs. audio provided by a web conferencing app. Here's how many reporters choose to do this:
Connect your microphone to your computer the same as you would for a live proceeding. (If you typically use the built-in microphone in your laptop, consider connecting and using an external microphone for better results.)
-
If your cell phone’s built-in speaker is not sufficiently loud for you to hear it wherever you will be writing, connect it to an external speaker.
There are a wide variety of brands and models of speakers built for phones available in a wide range of prices. Any model that is advertised to work with your brand and model of phoneshould work. You may want to consult colleagues as to the particular speakers they prefer to use for this type of work.

In most cases, connecting the phone to the speaker via Bluetooth is a plug and play operation. Simply turn on the speaker, and then turn on your phone. The phone should search for the device and connect. If it does not, check the settings feature for your phone, find the Bluetooth option, and select the name of the speaker as the device to which you want to connect. (If you still fail to connect, consult the manual that came with the speaker.)
TIP: Some speakers will have batteries that require charging, some can be plugged in. If you want to keep the device charged while using it vs. relying on its battery power, plug the charging cable into an external power source, such as a wall outlet or a USB power supply (sometimes called a power brick). Although the speaker may be able to be powered through the USB port of your computer: connecting it may cause the speaker to connect to your computer instead of your phone, and you would then have to manually change the connections.
Use your cell phone to call the number provided in the emailed invitation to the online meeting. , or, if you’ve clicked the Join button and are given an option between Computer Audio and Phonecall, click the Phonecall tab or option, and enter the phone number. (You will likely be given several phone numbers with several different area codes in different time zones and proximities to your current location.)
-
Place the computer’s microphone near the speaker. (If you are not using an external microphone, you may need to place the speaker nearer to the computer’s built-in microphone. Check your computer’s hardware manual to determine the location of that microphone.)
TIP: As you are NOT using the web conferencing application’s audio, you can safely mute the audio microphone shown in the toolbar as that only affects sound from the web conferencing app. If the mute icon has a down arrow next to it, click it access additional features such as an option to disable the web application’s audio feature. Turning off the web conference audio will not affect you because you are taking the audio from a different source (the telephone).
-
Open the web conference application on the other computer by clicking the link in the invitation that was emailed to you.
Setup for Realtime Translation and CaseViewNet
The easiest method to provide your realtime text to your attorneys is to use your CaseViewNet License and Session Code and output to CaseViewNet Browser.
-
If you do not yet have these tools, here’s how to purchase a CaseViewNet License and Session Code at the same time:
In CATalyst, click Help, About Case CATalyst (Alt + h, a).
In the About Case CATalyst dialog, click the CVNet button.
In the CaseViewNet dialog, click the Get CVNet button.
-
In the Purchase/Renew CaseViewNet dialog, do the following:
Click the copy number to clipboard link.
Click the Visit Website button.
-
When the purchase page appears on the Stenograph website, do the following:
Scroll down and verify that the Call-in Number* field has been populated. If there is no series of letters and numbers separated by dashes in that field, either click the field and then press Ctrl + v to paste the number you copied to the clipboard in Step 4, or, right-click the field and select Paste.
Type your Stenograph Customer Number into the Stenograph Customer Number* field.
Your customer number is needed to make sure the CaseViewNet license is activated in your Stenograph account.
Click Next and follow the prompts to complete your order.
Check the box next to Add a CaseViewNet Cloud Session Code. This will add a Session Code to your order and allow you to provide remote realtime services with your CaseViewNet License.
-
When the order is finished, you will need follow these steps to renew/refresh your Case CATalyst
e-Key and to enable your CaseViewNet license:If the Purchase/Renew CaseViewNet dialog is still open, click the Close button.
In the e-Key Setup dialog, click the Automatic e-Key button.
When the last line of the Options Setup dialog reads Done., click the Finished button.
Click OK to close the About Case CATalyst dialog.
-
Setup for Remote Realtime
Begin by following the instructions listed on pages 6-12 that match the device(s) you are using for CATalyst realtime translation and the web conferencing app, and the type of audio access you are using to record to AudioSync.
-
Output to CaseViewNet
When you reach the step to begin translation on CATalyst, after you give the job a name and select other options, but before you click OK to begin realtime translation, do the following:
At Output To: select CaseView.
-
At View or Change CVNet click Passwords.
To receive your realtime text, the participants in the proceeding will need your Session Code and a password. The password that you provide to the client will determine whether the client may save and keep the text after the session ends, and for how many days they may use that password.
-
In the CaseView Passwords dialog box, click New Password.
At Allow Save, leave the box checked if the person using that password should be allowed to email the transcript to themselves after the session. If they should not be allowed to keep the transcript, uncheck the box.
Leave the Connections setting at Multiple Users.
At Expiration, select an expiration date. For example, if you are working with the parties today only, you can set the expiration at Today, and their ability to access your feed with the password you provide ends at midnight. If you will be working with the same parties for several days, you can select the anticipated last day, so that they can use the same password every time. If you are outputting to a judge or a CART client, you might select NEVER so that the same password can be used without an ending date.
At Password, you can use the automatically generated password, or you can type in a custom password. You can repeat steps a-d as many times as needed to create as many passwords as you need.
-
To make it simple to communicate the session code and password to your viewers, click Browser Link. Your session code will automatically be copied to the Session Code field. Each of your non-expired passwords will appear in a dropdown list. Click the Choose Password to create link for: field, select the preferred password for the first client/participant and click Generate Link.
You can communicate the session password and/or link by pasting the link into an email message or, via a private chat message to the client in the web conference software. Click OK when finished.
Repeat these steps (click the Choose Password to create link for: field, select the preferred password, then click Generate Link) for as many passwords/participants as you want or need, pasting the link to an email/chat after generating each link.
Click OK to close the CaseView Passwords box.
When the client/participant receives the email or chat message with the link, they can click it to open the CaseViewNet Browser Edition website in a browser window. They can do this on the same system where they are running the web conferencing app, or on a separate device.
If using the same computer, tablet, phone, etc. to run both apps, they can switch between them, or resize the CaseViewNet window to make it easier to view the translation and the web conference at the same time.
- TIP: If the client wishes to view both the web conferencing app and the realtime text on one computer, advise the client/participant to click or press the CARTView button, and then press Escape to get out of full screen mode. The client can then drag the edges of the CaseViewNet Browser window to re-size it to whatever and place it at whatever location best meets their individual needs.